Enabling DomainKeys Identified Mail (DKIM) for an email account is one of the ways to combat email spoofing, and has other security benefits. Spoofing is when someone sends an email that looks like it came from you, but it didn’t.
Unfortunately, there is a lot of outdated and inaccurate information online about how to set up DKIM in Microsoft 365, including Microsoft’s own documentation! Also frustrating is that it often describes where to go instead of providing a link!
Basically, you need to get the correct CNAME settings, apply them to your DNS, then enable DKIM in Microsoft Defender. Much of the conflicting information online is regarding the correct CNAME settings.
After researching third-party sources and going down some rabbit holes, I finally figured out the whole process. Here are the steps.
Is DKIM Enabled?
Before proceeding, you probably want to verify if DKIM is enabled or not. To do that, save an email from that domain as a text file, then search for “DKIM” in that file using a text editor. If you find “dkim=none” instead of “dkim=pass”, it’s not enabled (with a caveat; read the end of the article).
Setting Up DKIM in Microsoft 365
First, make sure you’re logged into the appropriate Microsoft 365 account.
Get the CNAME Values
The steps below are the best way to get the CNAME values.
Go to the Email Athorization Settings in Microsoft Defender, located here:
https://security.microsoft.com/authentication?viewid=DKIM
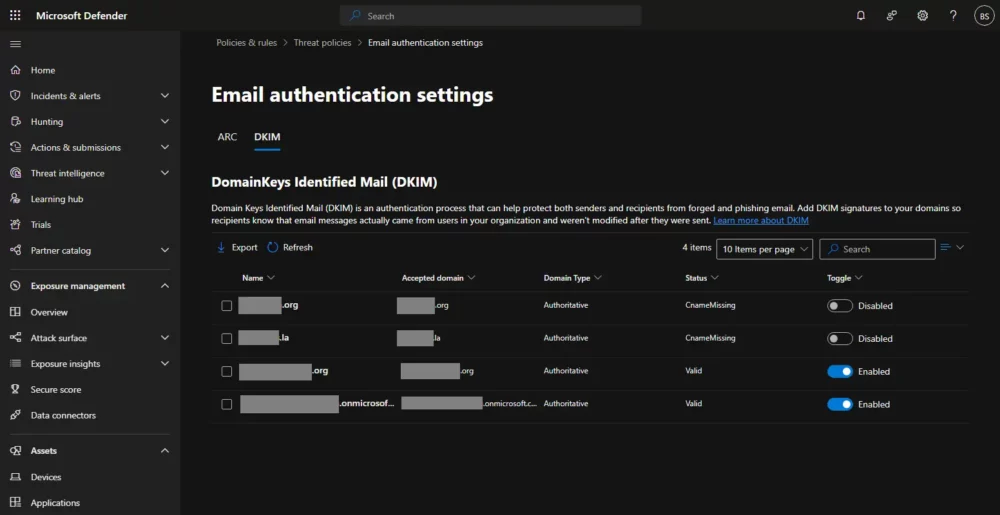
Click on the domain for which you want to enable DKIM, i.e., the name of the domain, not the checkbox. This is tricky because the name of the domain does not look or behave like a button or link!
A panel should slide out on the right showing you the exact CNAME values to enter into your DNS. If nothing is shown, click the blue button at the bottom that says “Create DKIM keys”, and they’ll show up.
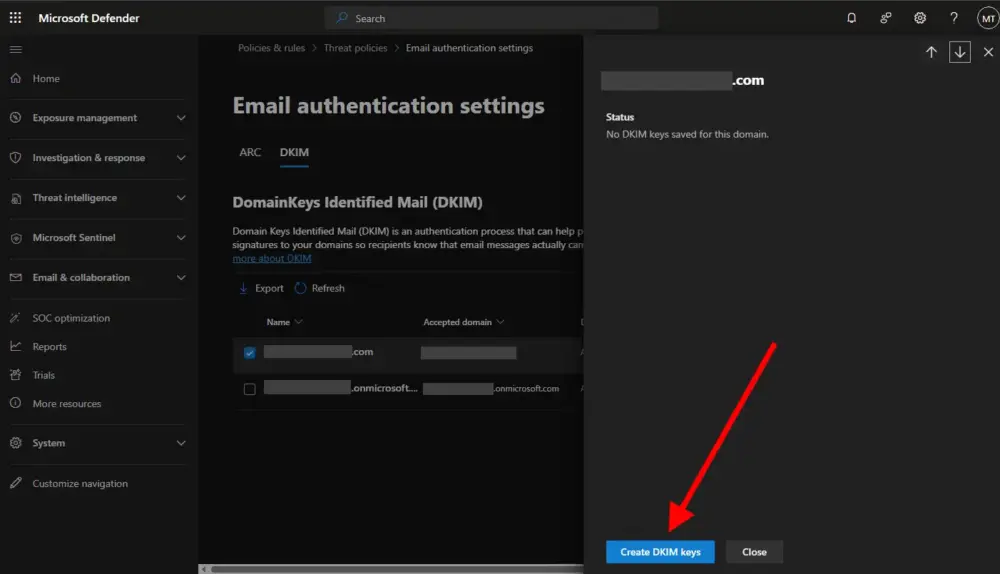
The resulting keys should look something like this:
Host Name : selector1._domainkey
Points to address or value: selector1-<yourdomain-com>._domainkey.<yourcompany>.onmicrosoft.com

Host Name : selector2._domainkey
Points to address or value: selector2-<yourdomain-com>._domainkey.<yourcompany>.onmicrosoft.com
The values in angled brackets will be different for you. Keep this window open and available for the next step.
Update Your DNS
Next, you’ll enter these values in your domain’s DNS records. The process differs depending on where your DNS is hosted.
In Cloudflare, you would go to DNS -> Records, then click “Add record” and select “CNAME” for type. Paste the “Host Name” value into the Name field, and the “Points to address or value” into the IPv4 address field. For these records, you will want to turn “Proxy status” off.
If your DNS is at Microsoft 365, go to Settings -> Domains, then click “DNS records”.
There are lots of online resources explaining how to update the DNS for all providers.
Get a Coffee
The next step is to wait for the DNS changes to propagate. I like to monitor DNS changes using a free online DNS propagation tool.
Note that even after my DNS propagation tool showed that the domain had propagated, I had to wait an additional 15-30 minutes for Microsoft Defender to actually see the update.
So really, go get a coffee or something before going to the next step. (Just like a watched pot never boils, a watched DNS never propagates!)
Enable DKIM in Microsoft Defender
Go back to the Microsoft Defender page and slide the Toggle for your domain to “Enabled”. If that works, you’re done! If not, you’ll see a pop-up showing why it didn’t work. Most likely, you just need to wait some more.
Checking Your Work
If you were able to enable the DKIM toggle for your domain, it should be working! To test, send an email to yourself from that domain, then save it as a text file on your computer.
In that file, search for “dkim”. You should see a line that includes “dkim=pass” if it’s working properly. Here are examples of non-passing and passing email headers:
Old email header:
Authentication-Results: spf=pass (sender IP is 40.107.243.90)
smtp.mailfrom=yourdomain.com; dkim=none (message not signed) <===== NOT WORKING!

New email header:
Authentication-Results: spf=pass (sender IP is 40.107.244.107)
smtp.mailfrom=yourdomain.com; dkim=pass (signature was verified) <===== WORKING!!!
Note, you may see other occurrences of dkim in the email text file under “Authentication-Results-Original” that are not signed. Don’t worry about those. Those are original dkim results from a forwarded or re-transmitted email.
Next Steps
I hope this was helpful. Did it work for you? Questions? Let me know in the comments below!
After you have DKIM working, the next step is to set up DMARC. I’ll write an article on that, but until then, here’s Microsoft’s guide to DMARC.

I am a freelance web developer and consultant based in Santa Monica, CA. I’ve been designing websites using WordPress and from scratch using HTML, CSS, PHP, and JavaScript since 2010. I create websites and web applications for businesses, nonprofits, and other organizations. I have a degree in Electrical Engineering (BSEE) from California Institute of Technology and a degree in Engineering Management (MSEM) from Stanford University.
Discover more from Web Developer Tips and Tricks
Subscribe to get the latest posts sent to your email.
Please Leave a Question or Comment