2025 UPDATE
I no longer recommend using a Google or Microsoft email account for sending transactional email from a website. The main reason is that I’ve seen these accounts get disconnected for various reasons (i.e., the client changed the password) or sometimes for no apparent reason at all, resulting in no email from the site being sent out, which could be disastrous if the site’s main purpose is to collect leads!
Instead, I recommend using a third-party SMTP email service like Brevo or SMTP2Go. The setup process is a lot easier as well! There are free and paid plans.
After setting it up, be sure to activate Fluent SMTP’s Slack notification feature so you get informed if there are emailing problems.
If you still want to use a Google or Microsoft email account, the original article is below.
Setting Up Transactional Email Using Google or Microsoft Mail
Setting up reliable email sending from a website can be kind of a hassle for web developers – at least it was for me.
For brochure sites, the web hosting company’s server email might be OK, but for any website requiring reliable email sending, it is prudent to use an SMTP email account to send email from your site.
Until I discovered this trick, I’d have to walk my clients through the painful process of authorizing their Gmail or Outlook email accounts with the site’s SMTP plugin. You had to be logged in while doing it, so I couldn’t do it for them.
In this article, I’ll show you an easy way to set up any Gmail or Microsoft account on your website, enabling it to send email reliably with minimal hassle.
The Harder Way
The more secure (but much more complicated) way to set up your site to use Gmail to send email involves creating and configuring an app in your Google account and entering the resulting Client ID and Client Secret code in your SMTP plugin. This works with a free Gmail account.
See the instructions for how to set up your Gmail account with Fluent SMTP. There are a LOT of complex steps and Google is constantly changing them so the instructions are always slightly out of date. (For example, during setup you’ll get a popup error saying “Google hasn’t verified this app”; go to advanced to move ahead anyway). Even I have to fumble around before getting this to work. This is not easy to set up!
This also requires you to be logged into the Gmail account in question. If the client has 2-factor, you’ll need their code to get in, or they need to turn it off temporarily while you work.
Unless your client is very tech-savvy, they probably won’t be able to do this themselves. Heck, even I have to fumble around before I can get this to work because the instructions and screenshots never quite match reality.
In short, this is a painful way to set up Gmail SMTP email on your site.
The Easier Way (Recommended in Most Cases)
An easier way to get a Gmail account to work with your site is to utilize the Gmail SMTP server, generate an app password, and enter that into your SMTP plugin. This method is limited to sending 2000 messages per day. But for smaller clients, this is a great solution.
Generating Your Gmail App Password
Here are the steps to generate a Google Mail app password (note, the account needs to have 2-Step Verification enabled for this to work):
- Go to https://myaccount.google.com/
- Go to Security
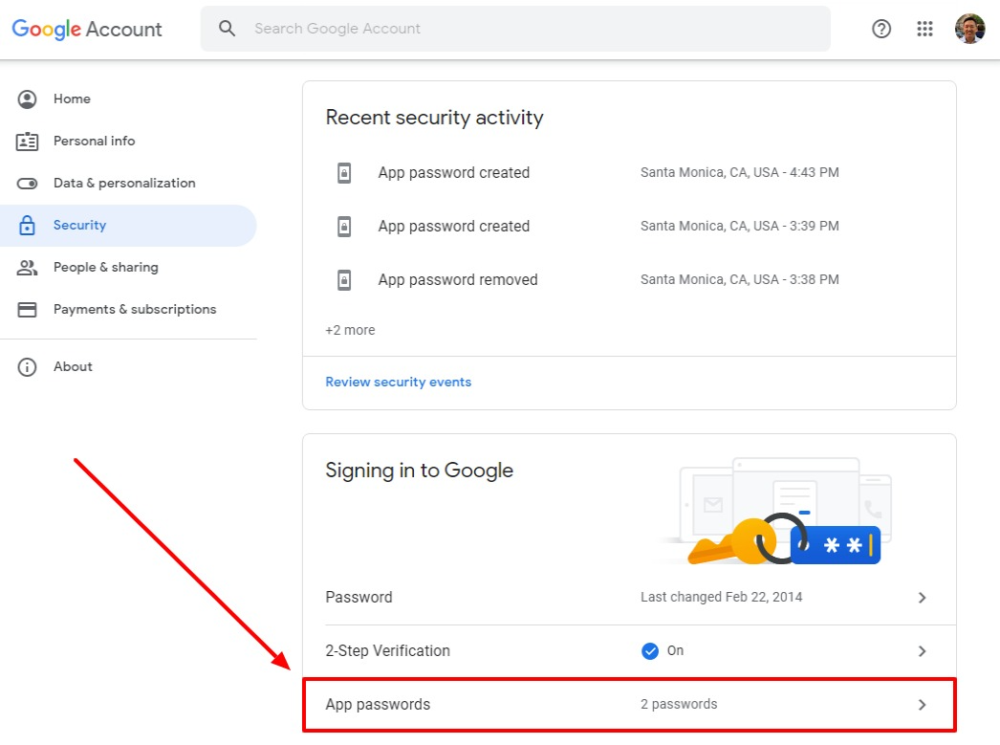
- In the “Signing in to Google” section, click “App passwords” (you may need to verify your password):
If you don’t see this option, it might be because:
- 2-Step Verification is not set up for your account (this requires a phone number).
- 2-Step Verification is only set up for security keys.
- Your account is through work, school, or other organization.
- You turned on Advanced Protection.
More info on this on Google’s page on signing in with app passwords.
Check these possibilities then return to the steps below when you see “App passwords” and can click it.
- When you see the popup, in the “Select App” pulldown, choose “Mail”.
- In the “Select device” pulldown, choose “Other (custom name)”
- Type in the name of your website followed by “email”. For example: “mywebsite.com email”, or anything descriptive like that so you’ll know what this password is for and won’t accidentally delete it later.
- Click Generate and copy the password that appears.
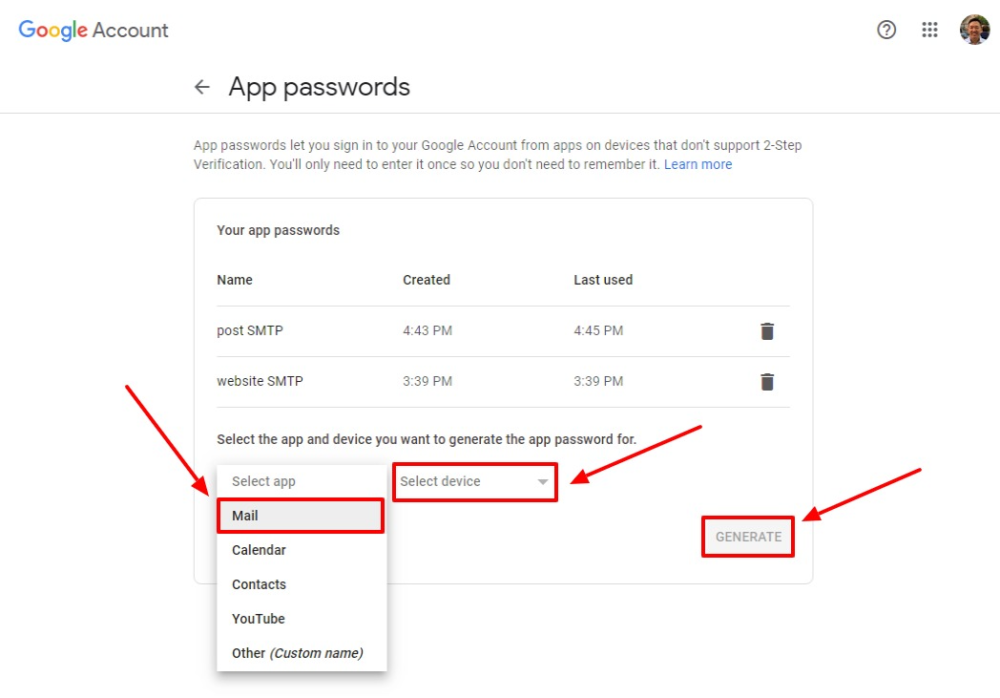
That final step is important. You won’t ever get to see that password again in the Google admin, so remember to copy and paste it somewhere!
That was pretty much the hard part. Give that password to your developer, or I’ll show you how to enter it into a WordPress SMTP plugin below.
Here’s How to Do It In Microsoft…
Here’s how to get your app password with Microsoft 365. Note, just like with Gmail, the account will need to have two-factor authentication enabled for this to work.
Once you have it, set up your SMTP email plugin using that password along with these settings:
- SMTP server: smtp.office365.com
- Port Number: 587
- Encryption method: TLS
Setting Up Your SMTP Plugin
My favorite WordPress SMTP WordPress plugin is Fluent SMTP because it includes email logging for free. It also lets you set up a fallback email account, which is really handy.
This is Google’s page on how to set up apps to use Gmail. I’ve summarized the settings below.
Fluent SMTP
Here’s a screenshot showing the settings for the Fluent SMTP plugin:
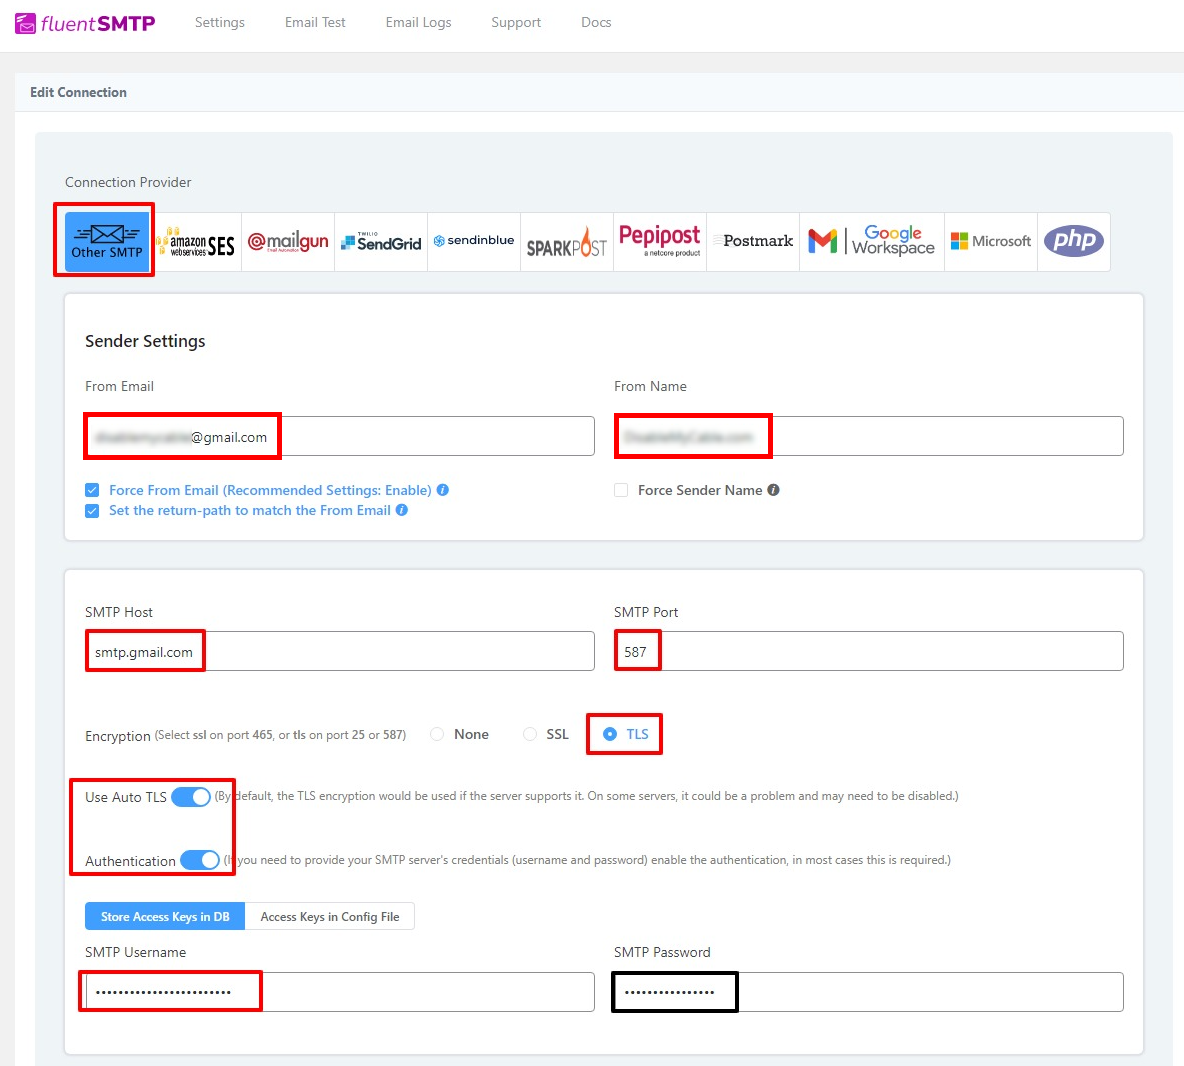
In the Sender Settings area, enter your Gmail address and desired “From” name. For SMTP username, enter your Gmail address.
Conclusion
To finish up, be sure to test and make sure the emails are sending! Overall, I’ve found this to be the easiest way to set up reliable emailing on a website using any Gmail account.
I hope this was helpful. Let me know if it worked for you in the comments below!
Also, I wasn’t able to get this trick to work using Microsoft app passwords on Outlook mail. If you get that working, please let me know. – Brian
Featured image photo by Austin Distel on Unsplash.

I am a freelance web developer and consultant based in Santa Monica, CA. I’ve been designing websites using WordPress and from scratch using HTML, CSS, PHP, and JavaScript since 2010. I create websites and web applications for businesses, nonprofits, and other organizations. I have a degree in Electrical Engineering (BSEE) from California Institute of Technology and a degree in Engineering Management (MSEM) from Stanford University.
Discover more from Web Developer Tips and Tricks
Subscribe to get the latest posts sent to your email.
Please Leave a Question or Comment
Love this! Ensuring reliable WordPress emailing with Gmail is crucial for staying connected with readers. Your step-by-step instructions are clear and helpful. Thanks for the valuable tips!
Hi, I was reading your article about using gmail for sending email on a WordPress website. I am wondering, when set up this way does a customer who receives an email see it is from the website email address or do they see the google email address?
Hi Jared,
Updating my answer, it is no longer possible to show a different “from” address than the google email address that is being used to send the email.
Brian